Press Ctrl + U to enter the Hue/Saturation window. Enable Colorize and change the spinners to 42, 27, -55.
Again, open the Hue/Saturation window and change the spinners to 0, 16, -10. Don’t enable Colorize.
Create 3 Text layers: "80", "T" and "Z". Move and rotate them to fit the following image. Also, right-click each of the 3 layers and choose Rasterize Type and merge them to 1 layer.
Hold Ctrl and click the new layer created by the 3 text layers. It will select all information that appears in that layer.
Select the texture layer (the brown metal); press Ctrl + C, Ctrl + V to create a new layer, with brown metal in the shape of the texts.
Change the Lightness in the Hue/Saturation window to (-)15. Delete the black text merged layer.
Create an Elliptical Marquee; start with the main vertex and use Shift + Alt to create a uniform-scale circle.
Create a new layer, change it to Soft Light and change its opacity to 16. Select the Brush tool, and with 255, 18, 51 RGB colours start painting in the selected marquee circle a soft non-uniformed frame (this red paint symbolises that this shell is a recycled one).
At this point we have now finished the Shell texture.
Projectile:
Again, open the texported UVs, invert and use the blending options to delete the whites. Add the 3 layers, change their Layer Styles and merge them together. Scale them down to fit the 1024 x 1024 canvas.
Press Ctrl + U to fire up the Hue/Saturation window. Check Colorize and change the spinners to 29, 43, -62.
Use the following image to paint the tip of the projectile.
Existing types: duplex (left) and triplex (right) projectiles. There is also a single colour, and of course no colours.
Black (RGB 21, 21, 33) – Armour piercing projectile
Red (RGB 111, 19, 40) – Tracer (night glowing) projectile
Azure (RGB 73, 106, 149) – Incendiary projectile (starts burning upon contact)
Green (RGB 5, 190, 4) – Frangible projectile (designed to disintegrate into tiny particles upon impact to mizimize penetration)
Blue – Expanding projectile (dumdum hollow point – creates a larger wound channel with greater blood loss and trauma)
Check back in Max where the pointy head tip is located related to the UV map (is it on the left side of the UVs? Is it on the right? (and so on)). In my case, the tip of the projectile is located on the left end of the UVs.
Start painting colours using the RGB data. Try to wave it a bit, but remember that, because of the mapping, the 2 edges need to be aligned.
After finishing the tip colours, create a mask for later use. Where you created , make a black solid colour, and where there is the original texture fill it with white.
The Shell Modifier:
Add a Vray material and add the shell texture to its diffuse map slot. Change the reflect colour to RGB 28, 28, 28. Change the Refl. Glossiness to 0.78 and the subdivs to at least 40. Change the IOR to 4.0.
For the projectile create a Blend material
Material 1: Add the projectile texture to its diffuse map slot. Change the reflect colour to RGB 26, 26, 26.
Change the Refl. Glossiness to 0.7 and the subdivs to at least 40. Change the IOR to 4.0.
Material 2: Add the projectile texture to its diffuse map slot. Change the reflect colour to RGB 28, 28, 28.Change the Refl. Glossiness to 0.78 and the subdivs to at least 40. Change the IOR to 4.0.
Mask Map: The mask map we created just before the shading.
Lighting:
Add 2 Vray lights. Type: planes, white coloured, no decay unchecked and very large compared to the bullet. One with multiplier set to 11 and the second with 9.
Rendering:
Place many bullets in your scene. Add a Camera and a Vray plane (Create > Geometry > Vray) beneath the bullets. Give it a grey material (RGB 128, 128, 128).
Open the Rendering tab (F10), assign Vray as the renderer and change the following variables:
Open the Material Editor. Choose an empty slot and add Vray HDRI map into the diffuse slot. Click on browse and choose the good old Kitchen.hdr (you can download it here: http://www.debevec.org/Probes/kitchen_probe.hdr). Change the map type to Spherical environment and drag Instance into the Reflection/Refraction slot in the Vray: Environment sub-menu.
And render!
The final image will be slighty Photoshopped.
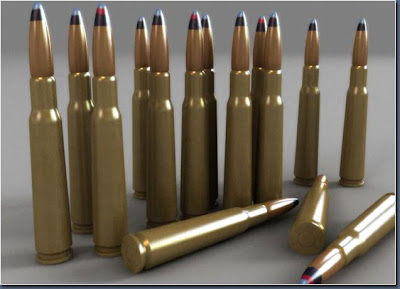
Final Render
Source:www.3dtotal.com


No comments:
Post a Comment